The Ultimate Setup Guide for Your Dwarflabs Dwarf III
The dawn of the smart telescope era has completely reshaped how enthusiasts interact with the night sky. No longer is the hobby restricted to those who can master the complex art of polar alignment, periodic error correction, and manual star hopping. Among the leaders of this revolution is DwarfLab, a company that captured the imaginations of stargazers and nature photographers alike with their ultra-portable, dual-lens systems. The Dwarflabs Dwarf III represents the pinnacle of this design philosophy, offering a refined, powerful, and remarkably compact solution for astrophotography, wildlife observation, and terrestrial photography. However, despite its user-friendly interface, achieving the best possible results requires a fundamental understanding of the hardware, the software ecosystem, and the environmental factors that influence a digital telescope's performance.
This guide serves as a comprehensive resource for owners of the Dwarf III, moving beyond the simple "turn it on and go" approach to explore the technical nuances that elevate a good session into a great one. Whether the goal is capturing the intricate tendrils of the Orion Nebula or tracking a rare bird in a distant canopy, the Dwarf III offers the tools necessary for high-quality imaging in a package that fits inside a small backpack. By following a structured setup routine, users can ensure they are maximizing the potential of the periscope tele lens and the wide-angle camera, while taking full advantage of the improved AI tracking and internal processing power found in this third-generation device.
Detailed Product Analysis: The Dwarf III Evolution
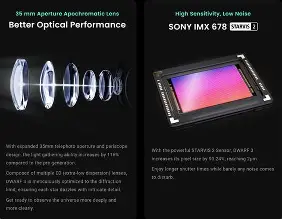
The Dwarflabs Dwarf III is not merely a slight iteration over its predecessor; it is a fundamental shift in how portable smart telescopes are constructed. At the heart of the system is a dual-camera setup that allows for simultaneous wide-field and deep-sky imaging. The telephoto lens has undergone a significant upgrade, utilizing a periscope design that maximizes focal length while maintaining a remarkably slim profile. This design is critical for portability, as it keeps the center of gravity low and reduces the physical footprint of the device, making it less susceptible to wind vibrations—a common enemy of long-exposure photography.
One of the most notable improvements in the Dwarf III is the integration of more advanced onboard processing. While previous iterations relied heavily on the connected smartphone or tablet for heavy lifting, the Dwarf III handles more of the "stacking" and AI-driven image enhancement internally. This leads to a smoother user interface and faster real-time previews. For astrophotographers, the inclusion of an internal filter wheel—featuring a dedicated UHC (Ultra High Contrast) filter—is a game-changer. This allows for imaging in light-polluted urban environments without the need for cumbersome external clip-on filters that can often introduce vignetting or dust spots.
The build quality has also seen a step forward. The chassis feels more robust, with improved weather sealing that provides peace of mind during damp nights in the field. The motors move with a precision that belies the unit's size, allowing for sub-pixel tracking accuracy during long-exposure sequences. Furthermore, the transition to a more efficient power management system and expanded internal storage means that users can spend more time capturing data and less time worrying about battery life or swapping microSD cards. These hardware improvements, however, are only half of the story. The true power of the Dwarf III lies in its software, which uses sophisticated computer vision algorithms to identify celestial objects and track them across the sky with uncanny reliability.
Pros and Cons of the Dwarf III
- PRO: Exceptional portability. The Dwarf III is arguably the most travel-friendly smart telescope on the market, easily fitting into carry-on luggage or a hiking pack.
- PRO: Dual-camera versatility. The ability to switch between a wide-angle view for scouting and a telephoto view for detail allows for a much more intuitive user experience.
- PRO: Integrated filter wheel. Having a built-in UHC filter drastically improves performance for deep-sky objects in suburban and urban areas.
- PRO: AI-assisted tracking. The device excels at identifying and locking onto birds, animals, and celestial bodies, making it a dual-purpose tool for nature lovers.
- PRO: All-in-one ecosystem. The lack of a need for external computers, guiding cameras, or heavy mounts lowers the barrier to entry for beginners.
- CON: Smaller aperture. Compared to larger, stationary smart telescopes, the Dwarf III has a smaller lens diameter, which limits its light-gathering power for extremely faint nebulae.
- CON: Non-replaceable battery. The internal battery design means that once the charge is depleted, users must rely on external power banks rather than swapping in a fresh cell.
- CON: Limited manual control. While the app offers many settings, it may feel restrictive to advanced astrophotographers who are used to granular control over every aspect of their imaging train.
Technical Specifications and Comparison
To understand where the Dwarf III sits in the current landscape of smart optics, it is helpful to look at how its core specifications compare to the standard expectations for ultra-portable digital telescopes. The following table highlights the key technical attributes that users should consider when evaluating this device for their specific needs.
| Feature | Dwarf III Specification | Standard Portable Class |
|---|---|---|
| Aperture (Telephoto) | 35mm | 25mm - 50mm |
| Equivalent Focal Length | 735mm (approx.) | 400mm - 800mm |
| Sensor Type | Sony IMX Series (High Sensitivity) | General CMOS |
| Connectivity | Wi-Fi 5GHz / Bluetooth 5.0 | Wi-Fi 2.4GHz / Bluetooth 4.2 |
| Internal Storage | 128GB eMMC (Integrated) | External microSD only |
| Weight | 1.3 kg (approx.) | 2.0 kg - 5.0 kg |
| Battery Life | 6 - 8 Hours (Continuous Use) | 4 - 6 Hours |
The Ultimate Setup Guide: Step-by-Step
Setting up the Dwarf III effectively is the difference between a blurry, noisy image and a crisp, detailed photograph. The process begins long before the first star appears or the first bird is spotted. Preparation is key to ensuring the hardware is calibrated and the software is ready for the environment.
Phase 1: Physical Preparation and Leveling
The most common mistake new users make is neglecting the physical stability of the telescope. While the Dwarf III features sophisticated electronic stabilization and tracking, it cannot compensate for a mount that is swaying or a tripod that is sinking into soft ground. It is highly recommended to use the included tripod on a hard, level surface. If you are in the field, look for a flat rock or compacted soil. When using a third-party tripod, ensure it is rated for at least twice the weight of the Dwarf III to eliminate micro-vibrations.
Shop the latest Cameras & Photography picks on Amazon.
Browse Now →Leveling is the next critical step. Although the Dwarf III can plate-solve (identifying its position by looking at the stars), the internal alt-azimuth motors function most efficiently when the base is perfectly horizontal. Use a small spirit level or a leveling app on your phone to check the orientation. A level base reduces the strain on the motors and results in smoother tracking, which is essential for the long exposures required to capture deep-space objects like M31 (the Andromeda Galaxy).
Phase 2: App Synchronization and Firmware Updates
Before heading out, ensure that your smartphone or tablet has the latest version of the DwarfLab app. Manufacturers frequently release firmware updates that improve AI tracking algorithms, increase Wi-Fi stability, and add new objects to the celestial database. Perform these updates at home over a stable internet connection. When you are in the field, the telescope creates its own Wi-Fi hotspot. For the best experience, use the 5GHz frequency if your device supports it, as this provides the bandwidth necessary for a high-frame-rate live preview.
Phase 3: The Calibration Process
Once the device is powered on and connected, the calibration process begins. For daytime use (wildlife or terrestrial), this usually involves simple autofocusing. However, for nighttime use, the "Calibration" or "Auto-Alignment" feature must be utilized. The telescope will move to several different parts of the sky, taking short exposures and matching the star patterns it sees against its internal map. It is vital to perform this in an area with a clear view of the sky. Obstructions like trees or buildings can cause the calibration to fail. If you are imaging from a balcony, ensure the telescope has at least a 60-degree clear view of the sky to facilitate accurate plate-solving.
Phase 4: Focusing and Filter Selection
The Dwarf III features an excellent autofocus system, but for critical astrophotography, many users prefer to verify the focus manually. Use the zoom feature on a bright star and adjust the focus slider until the star is as small and sharp as possible. This is also the time to decide on your filter. If you are in a "Bortle 6" or higher area (moderate to heavy light pollution), engaging the internal UHC filter will significantly enhance the contrast of emission nebulae. For galaxies and star clusters, which emit light across the full spectrum, the filter should generally be turned off to maintain natural color balance.
Buying Guide: Is the Dwarf III Right for You?
Choosing a telescope is often a compromise between power and portability. The Dwarf III occupies a specific niche, and understanding whether you fit into that user profile is essential before making the investment. Buyers typically fall into several distinct categories, each valuing different aspects of the device's functionality.
The Traveling Enthusiast
If you frequently travel to dark-sky sites, national parks, or international destinations, the Dwarf III is nearly peerless. Its ability to fit into a standard backpack alongside a laptop and a jacket makes it a versatile companion for those who do not want to lug around 20 kilograms of traditional equatorial mounts and counterweights. For this user, the portability of the Dwarf III outweighs the raw aperture of larger systems.
The Urban Astrophotographer
For those living in apartment complexes with limited storage and high light pollution, the integrated features of the Dwarf III are highly valuable. The built-in UHC filter and the quick setup time (often under five minutes) mean that you can take advantage of short gaps in the cloud cover right from a balcony or a small rooftop. It is an "on-demand" telescope that doesn't require an afternoon of assembly.
Find top-rated Cameras & Photography products at great prices.
Browse Now →The Nature and Wildlife Watcher
Unlike many other smart telescopes that are strictly for astronomy, the Dwarf III is a true hybrid. The AI tracking for birds and large animals makes it a powerful tool for birdwatchers who want to capture high-definition video or photos without the expense of a 600mm DSLR lens. If your interests are split between the earth and the sky, this dual-purpose nature provides significant value for money.
What to Look for and Consider
When purchasing, consider the environmental conditions you will most frequently encounter. If you plan on long sessions far from home, investing in a high-capacity PD (Power Delivery) power bank is a smart move, as it can charge the Dwarf III while it is in operation. Additionally, consider the software compatibility of your current mobile devices. The app-heavy nature of the system means that a modern, fast smartphone will provide a much better experience than an older, budget-tier model.
Advanced Techniques for Superior Results
Once the basic setup is mastered, users can look toward advanced techniques to squeeze every bit of performance out of the Dwarf III's sensor. One such technique is "Dithering." Dithering involves the telescope moving slightly between each exposure. This ensures that the fixed pattern noise of the sensor does not align across the stack, resulting in a much cleaner final image after processing. While the Dwarf III handles much of this automatically in its stacking mode, understanding the "why" behind it helps users appreciate the time required for a high-quality sequence.
Another consideration is the storage format. For casual sharing on social media, the JPEG output is excellent. However, for those who wish to perform their own post-processing in software like PixInsight or Adobe Lightroom, capturing in the FITS or RAW format is essential. These files contain all the data captured by the sensor without compression, allowing for much greater latitude in adjusting shadows, highlights, and color saturation. The Dwarf III's internal 128GB storage is more than sufficient for thousands of RAW files, but users should regularly offload these files to a computer to keep the telescope's memory managed.
Temperature management is an often-overlooked factor. Like all digital sensors, the one inside the Dwarf III generates heat during operation, which can lead to thermal noise. On warm nights, it is beneficial to give the sensor a "rest" between long sequences. Conversely, on very cold nights, ensure the lens has had time to reach ambient temperature before starting your final calibration to avoid focus drift caused by thermal expansion or contraction of the glass and chassis.
Conclusion
The Dwarflabs Dwarf III is a remarkable testament to how far consumer optics have come in a very short time. It democratizes the experience of seeing the universe, turning what was once a daunting technical challenge into an accessible and rewarding hobby. By focusing on a stable physical foundation, maintaining up-to-date software, and understanding the environmental factors at play, any user can capture stunning images that were once the exclusive domain of professional observatories or high-end amateur rigs. The strength of the Dwarf III lies in its balance—it is powerful enough to satisfy the curious mind, yet simple enough to be used by the whole family during a weekend camping trip. As you begin your journey with this device, remember that the most important part of the setup isn't the tripod or the filters; it is the patience and curiosity you bring to the lens. The stars are waiting, and with the right preparation, the Dwarf III is the perfect tool to bring them into focus.